Friday, 22 April 2011

A few thoughts on fertiliser

There's a lot of do's and don't with fertilisers and many ways to save money on what can be outrageous prices.

Very basically, (as this is a complete science):-  (organic growers look away now)

N, P & K - the constituent and basic parts of a fertiliser.

N is Nitrogen - plants need this for leafy, green, lush growth
P is for Phosphorus and this gives plants what they need for germination and root growth
K is Potassium and this is needed for flowering and fruiting.

Nitrogen can get washed out of the soil with rain and watering quite easily whereas the other two can remain in the soil or compost from one season to the next.

If you're serious a soil test will tell you how much or how little you have in your own soil.

Apart from NPK you need trace elements, of which there are many, for really good, healthy plant growth.

We all know nitrogen because we feed our lawns with nitrogen fertilizers and this gives that quick, green, lush growth.  Fine for lawns but too much green lush growth on fruiting vegetables and flowers will overpower the plants and stop them producing what it is it's supposed to produce - food and flowers.

Phosphorus sounds like something explosive but good root growth means a healthy plant able to take up the other nutrients and water from the soil.  The advent of products like Nutrimate and Rootgrow Mycorrhizal Fungi which aid the plant to maximise it's uptake of nutrients is revolutionizing growing gardening, especially vegetable gardening.  Strong roots = healthy plant = maximum chance for a top crop.

So, we're adding root development fertiliser with root development aids/products/substances.

Healthy plants potted on using Rootgrow and planted in soil treated with a general fertiliser.

Potassium is essential for fruiting and flowering and fertiliser rich in potassium are used in the latter stages of growth to enhance colours and to aid fruiting.

A general fertiliser like Growmore has equal parts of N, P & K and these are expressed as percentages of the total, so maybe 7:7:7 meaning 7% nitrogen, 7% phosphorus and 7% potassium.  General fertilisers like this are a good starting point to cast at a handful per square meter a week or so before planting or sowing.

Of course, some 'general' fertilisers can be expressed as 17:17:17 meaning the percentages are higher as a part of the overall product.  Heaven only knows what the remaining ingredients are - I must Google it and find out.

This is where things get interesting because once you move on you will get fertilisers higher in phosphorus than the other two ingredients (quite rare but available) and ones higher in potassium.  These are what are sold as the specialised fertilisers for Strawberries, potatoes, onions etc. and are sold at extreme premiums which is daft, daft, daft.

I found I was paying a fortune for 'potato fertiliser' and decided to see the NPK of a typical one.  I found it to be almost exactly that of Vitax Q4 (5.3:7.5:10 +TE) which is considerably cheaper.  TE are trace elements - the metals etc needed in vital but tiny quantities.

A typical 2.5 kilo pack of 'potato' fertiliser is about £15 whereas the same size Q4 is £6-£8 - half!

I'm not saying they will compare exactly but I do say to look carefully before buying what they market as specialist fertilisers for special crops - other cheaper fertiliser are almost the same.

A good general guide is to start off with a general balanced fertiliser (equal parts of NPK) and once the plants are in flower or ready to fruit switch to a higher potassium feed.  Liquid feeds are better in the latter stages as the uptake is more easily available.

A good green plant is a healthy plant and look out for signs of yellowing - this is either incorrect watering (too much or too little) or a deficiency in something so you need to fertilise/feed.  A soluble seaweed feed sprayed on is great as a pick me up for ailing plants.

As a result of all the farting around of grow bags I'm starting an experiment using Coir (the compressed dust from coconut shells) which is totally lacking in nutrients until nutrients such a Nu-Gro are added.  Commercial growers use this medium in their grow bags and I'm going to give it a try.  A packet of lawn seed mixed with Coir recently cost me cost £20 for 750gms which seemed madness.  I've done my own for under £1.50, giving rise to this little experiment.  I'm going to plant up a raised bed using Coir and Nu-Gro and see what happens.  This will be in a later post.


A peek inside the greenhouse

The small 10x6' lean-to greenhouse has proved invaluable but I'd like one five times the size - I can but dream.

I've had a tidy up after all of the seed sowing and growing on to plant out and am left with sweet corn, celery (from seed and from Medwyn's plants) in the propagator to keep them warm and at a steady temperature plus a variety of flowering plants for the hanging baskets and of course - tomatoes!

The tomatoes have done brilliant and all grown from seed.  I've used a growing light for 12 hours a day and a gas heater (propane as this doesn't freeze) keeping the minimum temperature as close to 10C as possible.

I've used a home made compost used for growing exhibition onions (see below) which is a pain to do but is proving so far to be very good indeed.  It holds the water very well and should have more than enough nutrients for the first stages of growth (until flowering).
First flowers already on the tomatoes - good strong plants too
I'm growing tomato Big Boy, a beefsteak tomato which will hopefully grow both indoors and out together with varieties Diplom F1, Ferline F1 and Koralik.  I got the seeds from Chase Organics (http://www.organiccatalogue.com/catalog/index.php?osCsid=18e60cea4ce2b9ca6f1b063441d9097d) and believe organic seed will resist disease and produce stronger plants than non organic - we shall see).

As a footnote I bought my flowering bulbs from here last year and they've turned out to be absolute show stoppers so this is a supplier I am finding to be up there with the best.

My best intentions were to grow only two plants per grow bag but I couldn't resist and have done three.  If I can contain myself I'll try two to a grow bag in one of the outdoor planters.

Greenhouse tomatoes
I'm using grow pots and the ring culture method in an oversize (double) grow bag.  Pressure on pricing has meant ever smaller grow bags rather than increasing prices but at last these large, double size bags are available).

The frames are from Harrods Horticultural which we've treated (they come treated but I never trust that alone) and painted them an antique blue using a safe paint.

A tip I saw said to remove the bottom 6" of stems and then plant the tomato right down to the upper stems thus giving a great depth of planting that will grow a longer and stronger root system. i've done this and we'll see how we get on but the plants are the strongest I've ever seen, anywhere. 

i think it;'s a combination of good compost (overkill I know), good growing light levels from the overhead growing light, and great seed. All we need do now is keep pinching side shoots out, feed and water and we're off!

Tomatoes growing on

Celery from seed and purchased plants keeping warm in the propagator

Sweet corn growing on at a nice pace

Next post I want to talk about fertilisers.


Special compost:

4 parts sieved compost.
1 part sieved top soil
1 part fine vermiculite
1 part sharp sand.

To every 30 litres of this mix add:

4 oz ground up Vitax Q4 (also substituted by 50/50 Superphosphates plus sulphate of potash instead of Vitax in some of the mixes)
2 oz ground limestone
2 oz Calcified seaweed ground up
2 oz Seaweed meal
1 oz Nutrimate powder.


Update and up to date 22nd April 2011

Well, we're experiencing one of the warmest and driest Aprils on record.  Last year was the warmest and driest since 1938 and was followed by one of the wettest May's ever.

It hasn't rained for weeks here in the South of England and there's no sign of any for a couple of weeks.


Radish Rudolph
I decided to take a chance, having looked at the forecast for the next few weeks, and planted out crops that you wouldn't normally dream of risking outside until mid May when the dangers of frosts are all but gone.

The downside was that greenhouse grown crops would get leggy and that would be worse so I'll keep a close eye on the weather and cover everything with fleece if the weather turns.  In the meantime, everything (almost) is growing at alarming rates.

After what was, as always, a long winter, it's great to see things growing almost before your eyes.

So here is where we are in the third week of April.

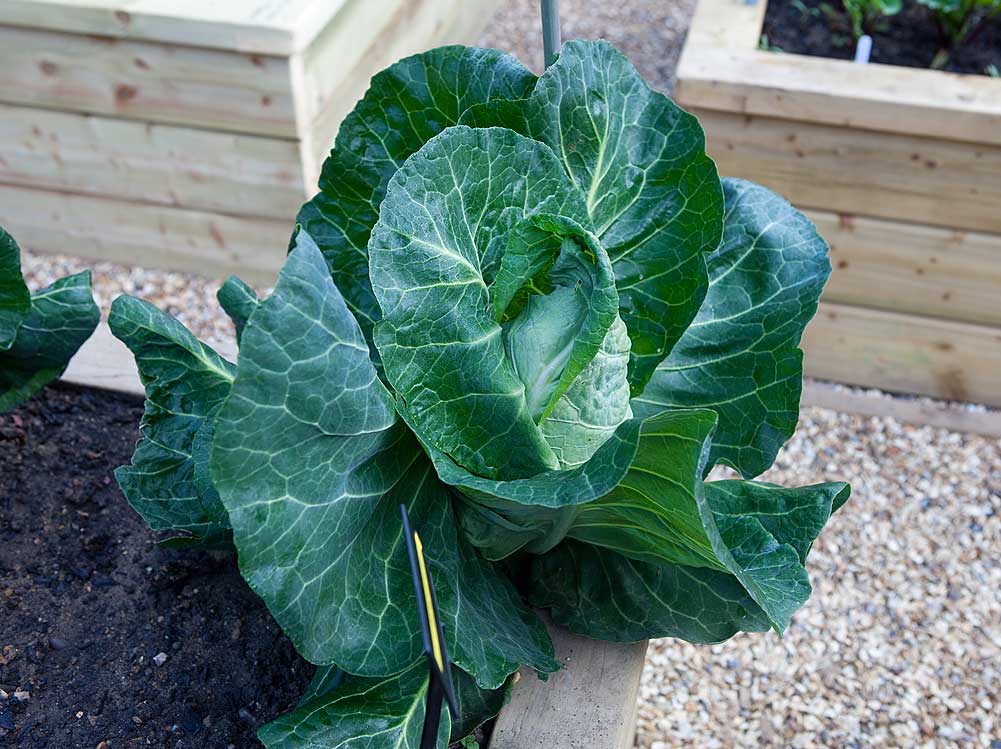
Last September we planted a variety of brassicas, mainly cabbage and cauliflower.  The cauli's gave small heads which were just about Ok but the cabbages have run to seed.  It seems it really was too late to be planting.  The one cabbage that did well though was Excel which has firmed up nicely and are ready to pick.  We'll try this one again later in the year.

Cabbage 'Excel"
The peas were planted in root trainers and all did pretty well,  germinating 95% successfully.  They're putting on good growth and so far nothing has had a go at them.  Growing in root trainers and then planting out was better than sowing direct and avoided any problems from mice on the look out for their dinner.

Peas 'Douce Provence' 12th April 2011

The peas 10 days later - we'll need to add taller twigs and supports soon.
One of the things I wanted to try was sowing parsnips underneath radish in the same row.  The theory is that the radish will be up and ready for picking about the time the parsnips germinate and show their heads.  I sowed parsnip 'Pixie F1' in the same row as some radish 'Rudolph'.

Parsnip 'Pixie F1' in front of a row of beetroot 'Boltardy; sown from seed
Either the parsnips germinated in patches or I managed to disturb some seeds while thinning the radish.  It basically worked and would prove a great space saver if you're really tight on growing space.  I'll certainly try it again.

Breakfast radish 'Red Top'
I adore radish and sowed a half row of 'Red Top' which germinated and grew in no time, probably about a month.  These were the crunchiest radish ever and a must to grow.  They are a breakfast type radish. The only problem is I eat them as I'm picking them and not many saw the inside of the kitchen.

Another space saving tip is to grow radish in pots so I'm trying a couple of varieties for fun.  They're easy to sow on the surface of your soil or compost or whatever you've decided to use as a growing medium and then cover with a thin layer of compost/soil.  Thinning is easy and you can move the pots around to the sunniest spots as required.  Very easy and also a great way to get kids interested in gardening as they germinate so quickly and aren't that fragile for children to thin out themselves.  Even the smallest balcony can grow them this way.

Radish growing in pots - about 2 weeks from sowing


Radish Red Top 5 to 6 days from sowing

Space is too limited to grow potatoes but the lure of early, home grown new potatoes and main crop varieties was too tempting to resist.

We've used potatoes sacks and planted chitted potatoes (potato seeds left in a cool light area, in our case the greenhouse, to sprout shoots) - 5 to a bag.  We only used certified potatoes from either our local garden centre or bought on-line.  We did buy a small supply of pre chitted potatoes and we'll only know whether this was worth the extra costs once we turn out the bags and see the results.

The potato sacks growing a variety of potatoes 12th April
The basic method is to place about 6 inches of compost in the bag, sit 3 to 5 seed potatoes in the bottom and then cover with compost and a sprinkle of fertiliser.  Once shoots appear you cover these with a layer of compost and a sprinkle of fertiliser and continue this until the bag is full.  From then it's a matter of letting the plants grow on with regular watering.

Harvesting time will vary according to how big you want your potatoes to be but a guide is from when the flowers open to when the tops die back.  I think it will be trial and error.

A lot of people report almost empty sacks when they harvest.  I think this may be a combination of a lack of fertiliser at each topping up of the compost, a lack of water and  a lack of sunshine (our bags in the sunniest spot are doing much, much better than those getting less sun).

This is the first time growing potatoes so I'll have to wait and see what turns out.  We're growing earlies, main crop and late potatoes and will plant up a few bags of summer potatoes in July/August to get our Christmas potatoes.  Fingers crossed!
Same potatoes 10 days later.
I want to talk about fertiliser in a later post and especially potato fertiliser.

The Chinese cabbages 'Wa Wa Sai' are galloping along, the first spring onions finally germinated and are growing at their own chosen pace, the early turnips 'Milan White' managed about 70% germination and are doing well and the beetroots 'Boitardy' are looking good.  We grew some from seed in the greenhouse and sowed some direct and both methods seem reliable.

Taking a big chance, we planted out the runner and French beans - 'Butler' and 'Isabel' respectively.  The runners are just getting their feet and starting to climb, albeit slowly but the French beans look a little timid.  The night temperatures may be a little low around 6-8C but I'm keeping a close eye on them.  We didn't want a glut of runners and so have used half of the growing frame for runners and the other half for French beans.

Runner and French beans 12th April

The beans 10 days later - steady progress
I'm happy for the beans to be a little slow right now as they are out a good month ahead of normal.  They're looking healthy, not at all leggy and so far nothing has attacked them.  I've sprayed with a fungicide and a bug killer as a precaution.

The autumn planting of onions - Autumn Champion, Senshyu Yellow, Radar and Red Cross are doing OK (see the previous post) and are just now starting to bulb up.

First sign of the autumn onions bulbing up


Autumn planted onions from sets
The spring planted garlic and onions are looking really good.  Onion 'Troy' and garlic 'Purple Wight', 'Jolimont' and 'Illico'.
These are quite close planted to see how intensive we can do in raised borders so I don't expect huge sizes which is fine for what we want.

Spring planted onions and garlic

The strawberries are doing really well which we'd expect given the exceptional weather.  Those is the strawberry planter are ahead of those is the raised border so it will be interesting to see what, if any, difference in crops there will be.

Strawberries in flower and straw in place to keep the fruits clean
We'll need to net both the planter and the raised beds once the fruit develop to protect from birds.

The shallots - 'Vigarmor', 'Pikant' and 'Topper', seem to be OK and have split into two bulbs each which apparently is right but as it's all a first we'll see what develops.  The broad beans are coming into flower more and more and being a dwarf variety should be easy to keep.  We've sprayed with a bug spray as I don't want black fly infesting them.  Apparently they don't do a lot, if any, damage but I just don't want them.

I want to pickle and preserve a few things and so have grown from seed some red cabbage and some white cabbage which is now planted out.

A selection of brassica

I grew a varied selection of Brussels, cabbage, brussel sprouts and broccoli which I've planted out together with a few crispy lettuce (Little Gem, Webs Wonderful) - all from seed.

And finally, for now, we've planted up some exhibition onions into pots.  There's no intention of showing but I wanted to see what really good onion plants from first class seed grown in pots will compare to my onions grown in beds from sets.  The pots are much smaller than you would use for exhibition onions but big enough to do the plants justice - it will be really interesting to see their progress.
Medwyns finest! (onions)

i'm scared to mention the carrots - I think I may have sown too early by a couple of weeks as they need a good soil temperature to germinate.  The 'exhibition' carrots in the special planters aren't showing at all after 10 days so I'll give them another week to see if they germinate.  If not I'll resow them.

The carrots sown in beds are eventually showing but this vegetable is one that takes forever to germinate.
Carrots not showing any sign of germination

The carrot boxes protected with carrot fly mesh.


Sunday, 17 April 2011

Germination temperatures

I found this table very useful but my carrots are taking an age to germinate right now, grrr.  I've sown some parsnips on paper towel in the propagator but they've all failed, double grrr.


Minimum Germination Temperature
21C/69F Aubergine
8C/ 46F Broad Bean
12C/ 53F French Bean
12C/ 53F Runner Bean
8C/ 46F Beetroot
8C/ 46F Broccoli / Calabrese
8C/ 46F Brussels sprouts
8C/ 46F Cabbage (summer)
8C/ 46F Carrot
8C/ 46F Cauliflower
10C/ 50F Celeriac
10C/ 50F Celery
18C/ 64F Chili Peppers
8C/ 46F Chinese cabbage
13C/ 55F Courgette
13C/ 55F Cucumber (Outdoor)
21C/ 70F Cucumber (greenhouse)
8C/46F Kale
8C/46F Kohl Rabi
8C/46F Leek
8C/46F Lettuce
10C/50F Mangetout
13C/ 55F Marrow
8C/46F Onion
8C/46F Parsnip
8C/46F Peas
18C/ 64F Peppers (Sweet/ Capsicum)
8C/46F Radish
8C/46F Salsify
8C/46F Spinach /Leaf beet
18C/ 64F Squash/Pumpkin
8C/46F Swede
12C/53F Sweet corn
18C/64F Tomatoes
8C/46F Turnip
 

Friday, 15 April 2011

The first plantings - September & October 2010, January 2011

We had no time or space to grow from seed last year and so bought in a few plug plants from one of the main proprietary seed companies.  By the time we were ready to plant the very first plants, it was already the end of September.

Autumn planted (?) Broad Beans in flower already


We tried a few spring collections of plants but somehow managed to get the labeling wrong in the haste to get planted resulting in thinking what were cabbages gone to seed and bolting turning into pretty good purple sprouting broccoli.  Mind you this was before me asking the Commis Chef to try to salvage what what left of such a 'cabbage' and getting the reply that the leaves didn't really look or taste cabbagy and so was thrown out after an attempt at cooking it.

Lesson 2:     Label, label and label again.  
Lesson 3:     Variety plant collections from on-line growers are a good option for smaller plots but you get far too many plants and have to give or throw more than half away.  You also get alot of what you won't want or use.  If only they'd do smaller quantities!

Is it a bird, is it a plane?  It sure isn't a January King cabbage

We also tried a collection of Chinese leaf plants which included Pak Choi Ivory.  This is normally planted in August and harvested through to December and this proved the case.  It was quite a success as it grew really quickly.  The other Chinese plants proved less than useful in our cooking needs but grew pretty well, all things considered..  Chinese plants seem to grow very quickly as we're seeing from the seed sown Chinese cabbage Wa Wa Sa this year.


Chinese cabbage Wa Wa Sa seed sown directly into the bed no more than a month ago and leaping off to growth

The brassica 'collection' from last year had varied results but was far too late going in to give it the best chance.  January King cabbage just didn't have the right time to mature and needed to be planted in August rather than the end of of September as we did.  The same applied to a savoy cabbage named Wintessa.

The cauliflower Alpen did, to it's credit, give small heads but these were not as tight as you'd want and therefore just a half failure, half success given the late time of planting.  Even the best grower can have some years where cauliflowers won't head up at all so I guess we didn't do too bad.

The main problem in all this was that we received 16 plant plugs of each of 4 brassica giving us far more than anyone would need for our size of plot.  They were about £10 as a collection and so were too tempting not to buy.  As we're now up and running growing from seed we'll rely on our own choices of plant and especially plant the number we need for this year.

Not everyone has the space, facility or desire to grow from seed so plug plants are a great option, especially now with the grafted options available.  Growing from seed is cheaper and very rewarding though.

A packet of seed, some good compost and a greenhouse fitted with a decent propagator and it is tempting to sow dozens of seeds of EVERYTHING.  This only results in mass frustration over where to put them all unless you have a massive greenhouse.  

Tip: Little is more just has to be the golden rule.

One great success, despite being planted out late, has been the cabbage Excel.

Cabbage Excel

This was one of the four in the brassic collection and produces good pointed hearts or can be used earlier as 'leafy greens'. Harvest November through to May so as it's only mid April and the plants are ready to use I am the proverbial piggy in the wotsit right now.  

Despite the fact we have 9,426,498 pigeons in the trees surrounding our garden  who will, trust me, devour young brassica plants in no time, especially during colder months when looking for food, they didn't touch these.  

The Excel cabbage plants were the only one left unprotected by netting from the birds too.  We grew half a dozen plants next to the Chinese collection so maybe, just maybe, there's something in that?

They have hearted up really, really well and subject to the Commis Chef letting me know it cooks well and tastes well,  will be one of the few traditional cabbages we'll grow next year.  I'm pretty much decided on growing red and white cabbage for pickling and for home made coleslaw and salads.  Cabbages just take up alot of room and I think you need to find a variety and type you like to eat, is reliable to crop and gives consistent results.  We're trying one called Greyhound this year from seed and we'll see how that goes.

Onions planted Autumn 2010

I know for a fact I've gone overboard on onions, shallots and garlic but these are what I really wanted to prove to myself I could grow.  Every good vegetable garden I've seen has immaculate rows of onions and it's like a badge of pride somehow.


Again, I ordered far too many onion sets and ending up giving at least half to a neighbour who gave half of his half to a mate and so on and so on.  The major on-line companies sell bags of onion sets far too big for most of our needs.  This is where I wish I had an allotment and could do some 'trades' but hey.

In January I ordered some heat treated onion sets and forgot about them until the postman arriving literally as I write this post - i've now another three bags of onions and no-where to plant them.


Lesson 4: Keep a good track of what you are ordering during the winter months - a single order of various things can end up getting delivered in many lots ( to coincide with planting times which makes sense) and it is ridiculously easy to lose track.  


We planted Onion Autumn Champion, the large Japanese variety Senshyu Yellow, Radar and Red Cross.  These are in the original heavier soil and are going OK but not as good as those planted this spring in the improved soil mentioned in the earlier post.  I used a proprietary onion fertiliser hand sown before planting and this spring gave them a boost of a seaweed soluble feed called Medwyns Seaweed Gold.  It's not cheap but it perked up the plants after a few days and really got the brassica going too.  http://www.medwynsofanglesey.co.uk/shop/SUNDRIES/Medwyns-Seaweed-Gold/prod_12.html

I'm very excited at the new products and discoveries now available that enable plants to maximise their uptake and use of nutrients and resist disease .  The seaweed spray definitely showed results within days and using RootGrow on bare rooted plants and in root trainers seems to be very good indeed, although I can't compare it with not using it.  We'll report over the coming weeks and months and see how we get on.


Nutrimate is another such product I'm trying. I am incorporating this as one of a number of 'ingredients' in special compost, of which much more later.  I did warn you that I believe everything I read on the packet until I prove it otherwise.


Broad beans:  We planted some plug plants in late September (in the original soil mix) - these were Broad Bean Aquadulce Claudia.  With the very heavy snows this winter and extreme colds only a few survived and it's these, we think that are the ones in flower already.


Early this tear we grew some broad beans from seed, The Sutton Seeds from Marshalls ( http://www.marshalls-seeds.co.uk/broad-bean-the-sutton-seeds-pid1910.html).  These are a dwarf bean growing to no more than 45cms compared to the 100cms of Aquaduice so we'll be able to see which are which later in the season as they are in the same bed.  We'll see how many of the overwintered plants survived and whether it was worth doing an autumn planting or not.


Certainly the Sutton Seeds beans are doing really well - we grew them in root trainers adding in a little RootGrow (http://www.rootgrow.co.uk/rootgrow_how.php) of which I am quickly becoming a a strong disciple, more of this in a later post. 


Broad Bean - The Sutton Seeds' growing well 

Deliberately close planted beans to see how intensively we can grow in raised beds.  Mildew can result from a lack of air flow around plants and I'll watch for this carefully.  I'm happy they'll get enough feed though to sustain close planting.


Strawberries:  I had read that Strawberry plants actually need some cooler weather to allow flower bud formation.  However, when the weather starts to dip below freezing at night, it's time to cover the plants.  I didn't bother despite crazy sub zero temperatures this winter and they've survived perfectly well.  They are quite well protected and so probably didn't suffer a wind chill as bad as they would if more exposed. 


We planted a small variety of plants which eventually arrived mid January, in time to get some winter cold on them.  We chose an early, mid and late variety:


  • Marshmarvel - early
  • Cambridge Favourite - main crop
  • Amelia - Late crop


In all, we had 12 plants of each and half of these took up a complete bed.  Despite the persistent efforts of our local black and white thug of a cat (or maybe the fox) digging into this bed above all others, they are in good shape and showing excellent new growth at the base.


The three varieties showing good new growth


Again, I used a sprinkle  RootGrow in the bottom of each planting hole.


As we had another dozen of so plants left over I made up my own strawberry planter.  The rubbish that is available at garden centres and on-line should be banned, banished and the sellers sent to the Tower!  They lead to heartache with people expecting a really good crop only to find out they don't hold water, are too small and, sorry to say, total crap.

I considered buying a large oak barrel which would be perfect and what would have been used in days of old but by the time I paid for it and then paid another £40 getting it sent it didn't make sense.  We were making up cases for the Exhibition Carrots (more later) and so converted one into our own strawberry case.  I'll post a separate post about this, and the carrot boxes later.


The 'home made' strawberry planter complete with good growing medium and watering pipes to get water down to the lower plants on each side
We had to buy a few extra plants from our local garden center and shamefully I forgot to record the varieties.  I think it;'s these that are producing a mass of flowers already.


Finally, we tried some late sowings of Lettuce All Year Round, a few radish and spring onions but it really was too late in the year and they didn't come to much but it was worth a go.  A few plug plant lettuce's produced some results but again weren't really worth the effort.


Cherry tree:  As a kid I had a friend who had the most amazing cherry tree in his front garden and this made him the most popular kid in school for weeks during the fruiting season.  His Mum used to tell us we were only there for the cherries and she was absolutely right.

He used to let me ride his BSA Bantam 125 which was very cool and way faster than my Vespa 160.  The Vespa was a far better pull with the girls for sure though but cherries and a BSA had their own attraction.


Cherries for me have a special memory (sorry, I'm grinning now)


This year I decided to grow a tree on dwarf rootstock in a raised bed about 1m x 1m backing onto the garage wall and in a complete sun trap.  I'm going to train this into an espalier which looks pretty straight forward.  I came across an excellent guide on training at http://www.realenglishfruit.co.uk/content/treetraining.htm


The main thing I learned here was not to bend the branches too early in the first year of the growth of the young tree.  The sap has to be rising and only late in August would you bend the lower branches down to horizontal and tie into the wires.


The tree I bought is Cherry Stella from http://www.trees-online.co.uk/Stella-Cherry-Tree.html


Whilst not being the cheapest trees around, I wanted to buy from a specialist and one who could give me advice.  The help I got was superb and the guy there spent as much time as we needed making sure he supplied exactly what he thought I'd need.  I let him choose the tree and they even graft it onto dwarf stock for me as semi dwarf seemed the smallest option on their web site.  I can't recommend them enough.


We also bought a small apple tree at the same time, explaining it was for the kids and grand kids really and he chose a Semi-Vigorous Rootstock MM106 (Bushdwarf stock (MM106) Cox's Self Fertile. This should bear fruit early October and store until January, if not all eaten before of course.

Both the cherry and apple trees won't need cross pollination thanks to this choice of trees and the advice given by Trees Online.


The next post will be the spring sowings and plantings.

Thursday, 14 April 2011

The soil

Mistake number One ?  Probably number Ten but we've learned.

We bought in a landscaping mix at about £70 a tonne delivered in 1 tonne bags which is a mix of compost, sand and soil.

We've had very little bother with weeds in the soil but it has proved far too heavy.  We filled to the top of each bed to allow sinkage but as it's quite a heavy soil it didn't budge an inch - typical.

We know we'll have to 'work' the soil for a number of years to get it as we want and that it will be an ongoing process, adding manure and compost each year.  We incorporated some mushroom manure in the lower levels when filling and added a good handful per m2 of general purposes Growmore.

This spring, we started removing the top 6-8 inches in those beds that weren't planted (we'll do the others once the crops are pulled) and adding in a good level of compost and forking it well in.  The difference is huge already. I've had a mix of 'home grown' compost and bagged compost but the latter lacks guts and we know we need to add fertilisers to get good yields. (I'll post later about this but a seaweed spray has appeared to be really good as a pick me up, booster)

Autumn planted onions on the heavier, original fill of soil
Onions and garlic spring planted on the improved soil - a big difference already.


I came across a good way to calculate how much soil you'll need for a bed:

Lenght x Width x Depth (in metres) x 1.3 = number of tonnes soil needed.  We found this to be pretty spot on.

I'll post about the first, autumn plantings next.

The beds

Tongue & groove boards and lining.  Good wide edges to sit or perch on or rest tools and plants on - great if you have a bad back or other ailment
  
The site is quite small at 15m x 10m (about half the size of the average allotment?) and backs onto the garage with a wooden fence to the left.  Sitting across a diagonal of West - East it gets the full afternoon sun which is what I wanted as this would be warmer both earlier in the season and later.  There is a small lean-to greenhouse at the side in addition though.

The second bed up in one of Paul's wheelchair access beds which we adapted and had lowered - see below for details

We terraced what was a sloped area of grass using shutter boarding and infilling with a mixture of hoggin (Hoggin is a a mix of gravel, sand and clay that binds firmly when compacted, yet allows water to drain through it)
and sand covered by terram (black landscaping fabric for weed control) and then topped off with shingle for ease of maintenance.

Tip:  It's important to compact the hoggin using a small petrol driven compaction plate or manually using a roughneck tamper if you are feeling energetic.  Even if not working on a slope, alot of weight, once the beds are full, will go on the top and you don't want to have to deal with slippage or subsidence later on - what a disaster that would be! 


All of the photos above were taken August - September 2010
and those below, April 12-14th 2011

Since starting in August 2010 we've added a number of new beds, virtually each month and now have about 19 in all of all different sizes and depths.  The basic configuration is about 1.8m x 1.2m, the advice being don't go above 1.2m (4 feet) wide for ease of access from both sides.  The other advice is don't go over 1.8m (6 feet) long because you want to walk around from end to end and side to side easily and not be tempted to walk over the bed.

I kind of agree with this but we've added all sorts of lengths and widths and found the above holds true as a basic guide.  We prefer to have beds with a width in multiples of 45cms and lengths in multiples of 1.4m for one reason and one reason only - the best cloches in the world are 40cms wide and 1.4m long with the end pieces (more of these in a later post).

One or two beds are 3m long and I would agree this is on the limit even if they are great for runner beans, french beans and peas etc.


Yes, it's only April and the beans are out already - I'll watch the weather and cover up with fleece if we have a frost.
What is important is that these dimensions are the internal sizes, especially if you use wide capping as we have.

Depth wise we've gone for two options - either two planks high or three, these giving 36cms or 51cms depth respectively.  We'll rotate crops over the coming months and years but the shallower ones will be used for onions and gladiolus unless experience proves us wrong.  

Smaller raised bed with hoops supplied by Paul
The beds are open bottomed for drainage and all have a fabric lining.  About half have holes along the long side of the capping to take metal hoops for netting etc. although I've started to experiment with some frames, of which more later.


Raised bed with netting frame
We have a couple of beds on the patio and these are fitted with timber bottoms and raised on bearers for better drainage and to protect the patio below.


So, who made them?  One of the nicest blokes I have met and a very talented man - Paul Stokes at http://www.raised-gardenbeds.co.uk/.  Paul is happy to adapt, add and take away to meet his customer' needs and he's been great with me.  I've now had a variety of sizes and options and wouldn't hesitate in recommending him. 

Paul will make up and deliver completed for simple placing on site or make them flat pack for assembly on-site (they're quite heavy made up so flat pack is great for allotments etc if you've far to carry).  

Paul makes fabulous raised beds that take wheelchairs for those out there it may relate to.  I have one, albeit it lowered a little in height, and it's tremendously strong and therefore safe for a wheelchair user. 

In the next post I'll cover the soil we used to fill.